How to implement push notification in laravel with a simple documentation and handle them in mobile side
In this tutorial, we’ll dive into Firebase Cloud Messaging (FCM) and how to integrate it with Laravel 11 to send notifications. We’ll cover advanced features like scheduling notifications, subscribing users to topics, and sending data-only messages to improve your application’s engagement.
Whether you need to send real-time updates, group notifications by topic, or send background data silently, this guide has everything you need.
Step 1: Generate Firebase Service Account Key
To set up Firebase credentials for use in your Laravel project, follow these steps:
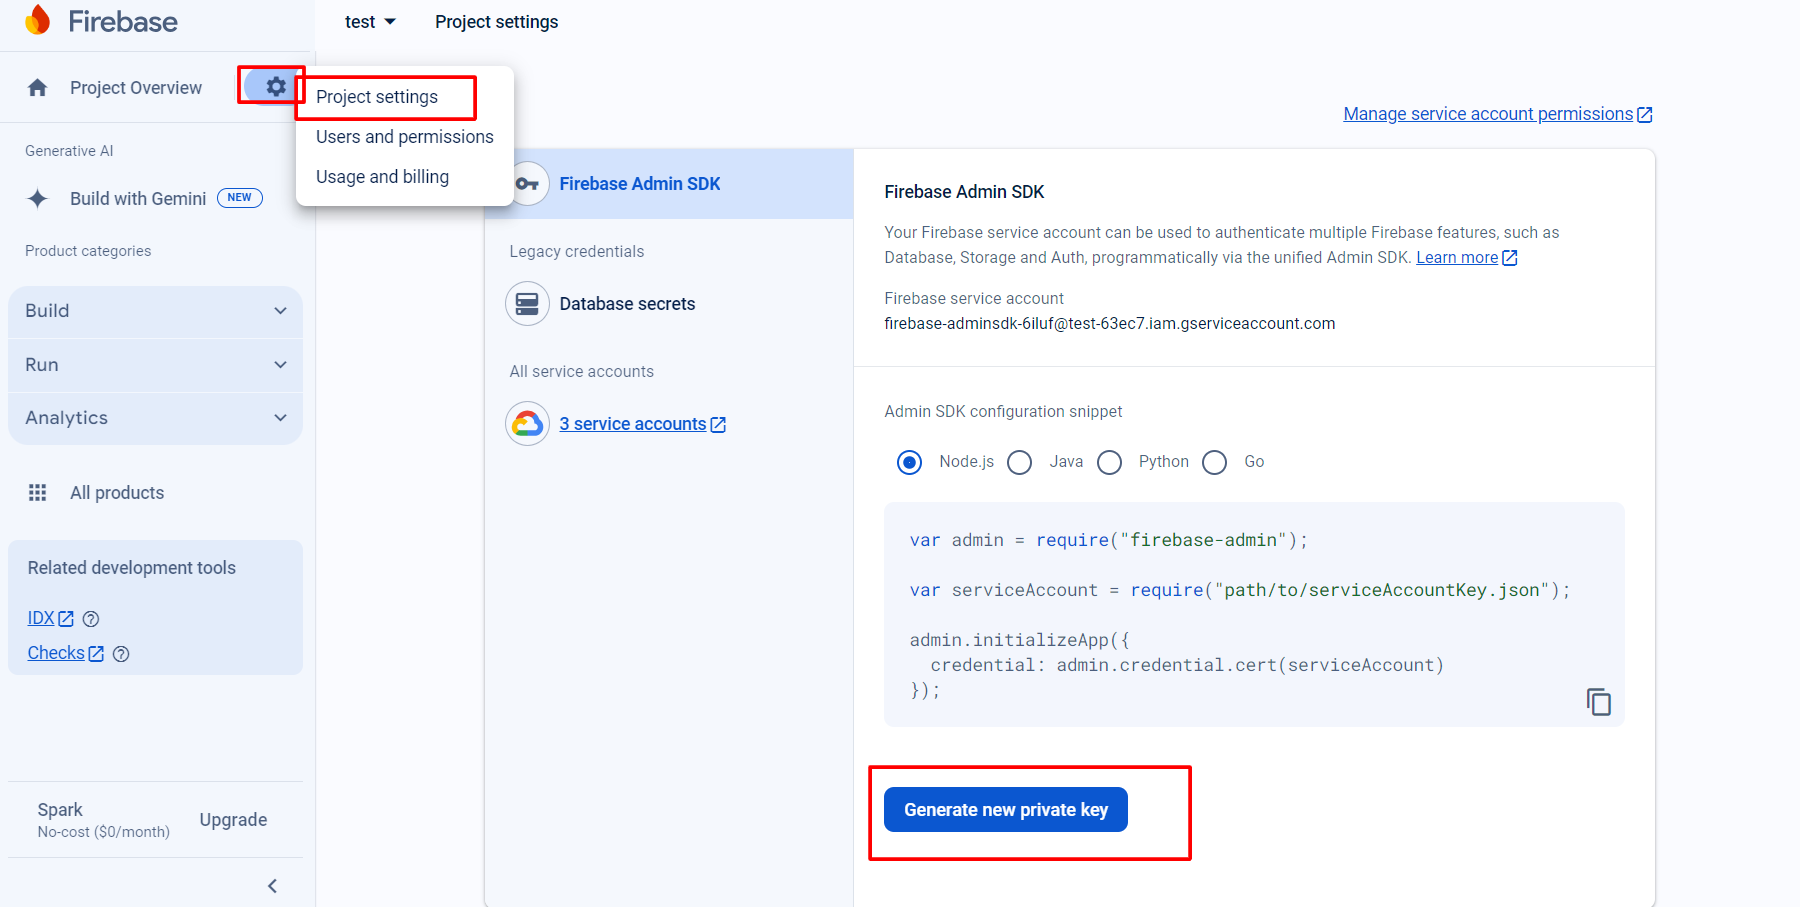
- Go to the Firebase Console.
- Select your project.
- In the project settings (gear icon), navigate to “Service accounts”.
- Click on “Generate new private key
- A JSON file containing your service account credentials will be downloaded.


Step 2: Place the JSON File in Your Laravel Project
Now, store the downloaded JSON file in a secure location. You can create a folder named firebase inside the storage directory and place the JSON file there:
/storage/firebase/service-account.json Storing it in a secure directory like storage ensures that your credentials are safe and not publicly accessible.
Step 3: Set Up the Environment Variable
Next, to make your credentials accessible in Laravel, set an environment variable in the .env file:
- Open your .env file.
- Add an environment variable to point to the location of the service account JSON file. For example:
FIREBASE_CREDENTIALS=storage/firebase/service-account.jsonThis step allows you to reference the credentials file in your Laravel code easily.
Full Code Integration
With the environment variable set, you can now integrate the code to send FCM notifications. Below is a PHP function that demonstrates how to send notifications via FCM using a Google access token.
FCM allows you to group multiple users by “topics” and send notifications to those users as a group.
public static function FCM($fcm_id, $notification) {
$fcmUrl = 'https://fcm.googleapis.com/v1/projects/your-project-name/messages:send';
$token = is_array($fcm_id) ? $fcm_id : array($fcm_id);
$bearer_token = self::getGoogleAccessToken();
foreach ($token as $item) {
    $fcmNotification = [
        'message' => [
            "token" => $item,
            "data" => $notification,
            'notification' => [
                "title" => $notification['title'],
                "body" => $notification['message'],
            ],
        ]
    ];
        $headers = [
            'Authorization: Bearer ' . $bearer_token,
            'Content-Type: application/json'
        ];

        $ch = curl_init();
        curl_setopt($ch, CURLOPT_URL, $fcmUrl);
        curl_setopt($ch, CURLOPT_POST, true);
        curl_setopt($ch, CURLOPT_HTTPHEADER, $headers);
        curl_setopt($ch, CURLOPT_RETURNTRANSFER, true);
        curl_setopt($ch, CURLOPT_SSL_VERIFYPEER, false);
        curl_setopt($ch, CURLOPT_POSTFIELDS, json_encode($fcmNotification));
        $result = curl_exec($ch);
        curl_close($ch);

        $resultData = json_decode($result, true);
        \Log::info('Fcm notification send fcm_id = ' . $fcm_id . " ::::", [$resultData]);
    }
}

public static function getGoogleAccessToken() {
    $credentialsFilePath = base_path(env('FIREBASE_CREDENTIALS'));
    $client = new \Google_Client();
    $client->setAuthConfig($credentialsFilePath);
    $client->addScope('https://www.googleapis.com/auth/firebase.messaging');
    $client->refreshTokenWithAssertion();
    $token = $client->getAccessToken();
    return $token['access_token'];
}
Explanation of the Code:
- FCM Function: Sends notifications to multiple FCM tokens.
- getGoogleAccessToken Function: Retrieves the Google access token required to authenticate the request
Summary
Integrating FCM with Laravel 11 involves generating a Firebase service account key, securely placing it in your project, setting up the environment variable, and implementing the code to send notifications. By following these steps, you can effectively send notifications via Google using Laravel 11.
[…] FCM Notification in Laravel 11 […]
[…] FCM Notification in Laravel 11 […]