Table of contents
- What does Scan to PDF do to your photos?
- When should you scan a document with your phone?
- Step 1: How do you take the photos?
- Step 2: How do you fix the crop and the filter?
- Step 3: How do you create the PDF?
- How do you scan to PDF on Android, iPhone, Windows and Mac?
- A real example, start to finish
- What are the most common mistakes?
- What are the best tips for scanning with your phone?
- Your phone is the scanner
- FAQs
To scan a document to PDF with your phone, open PDFChai's Scan to PDF in Chrome or Safari, tap Take a photo for the first page and Add photo for each page after it, then tap Create PDF. Each page is cropped, straightened and brightened for you, and there's no app to install.
A phone camera makes a perfectly good scanner. The trouble is that a plain photo of a document is tilted, shows the table around the paper, has a shadow in one corner and is often several megabytes. Send that to an exam portal or an HR team and it looks careless.
In this guide, we'll show you how to turn those photos into a clean PDF that looks properly scanned, how to fix a page that didn't crop well, and how to keep the file small enough to upload.
Let's get started.
Key takeaways
- You only need your phone's browser, not a scanner app
- Each photo is cropped to the page, straightened and cleaned up automatically
- Crop & filter lets you move the corners, rotate a page and switch filters
- Black & white gives the sharpest, smallest pages for typed text
- All your pages are saved as one PDF in A4, US Letter or the photo's own shape
- Your photos stay on your phone, because nothing is uploaded
What does Scan to PDF do to your photos?
When you photograph a page, the camera captures everything in front of it: the desk, your shadow and the angle you held the phone at. A scanner app's job is to throw all of that away and keep only a flat, clean page. Scan to PDF does the same thing inside your browser, in three steps.
It finds the page
The tool looks for the biggest bright area in the photo, which is usually the paper, and marks its four corners. That's why a white page on a darker table works so well. If there's no clear edge, it keeps the whole photo, and you can place the corners yourself later.
It straightens the page
A page photographed at an angle comes out wider at one end than the other. The tool stretches the four corners back into a proper rectangle, so the page looks as if it had been laid flat on a scanner.
It cleans up the light
It works out how bright the paper is in every part of the photo and evens it out. Shadows and uneven light fade away, the paper turns white and the ink stays dark.
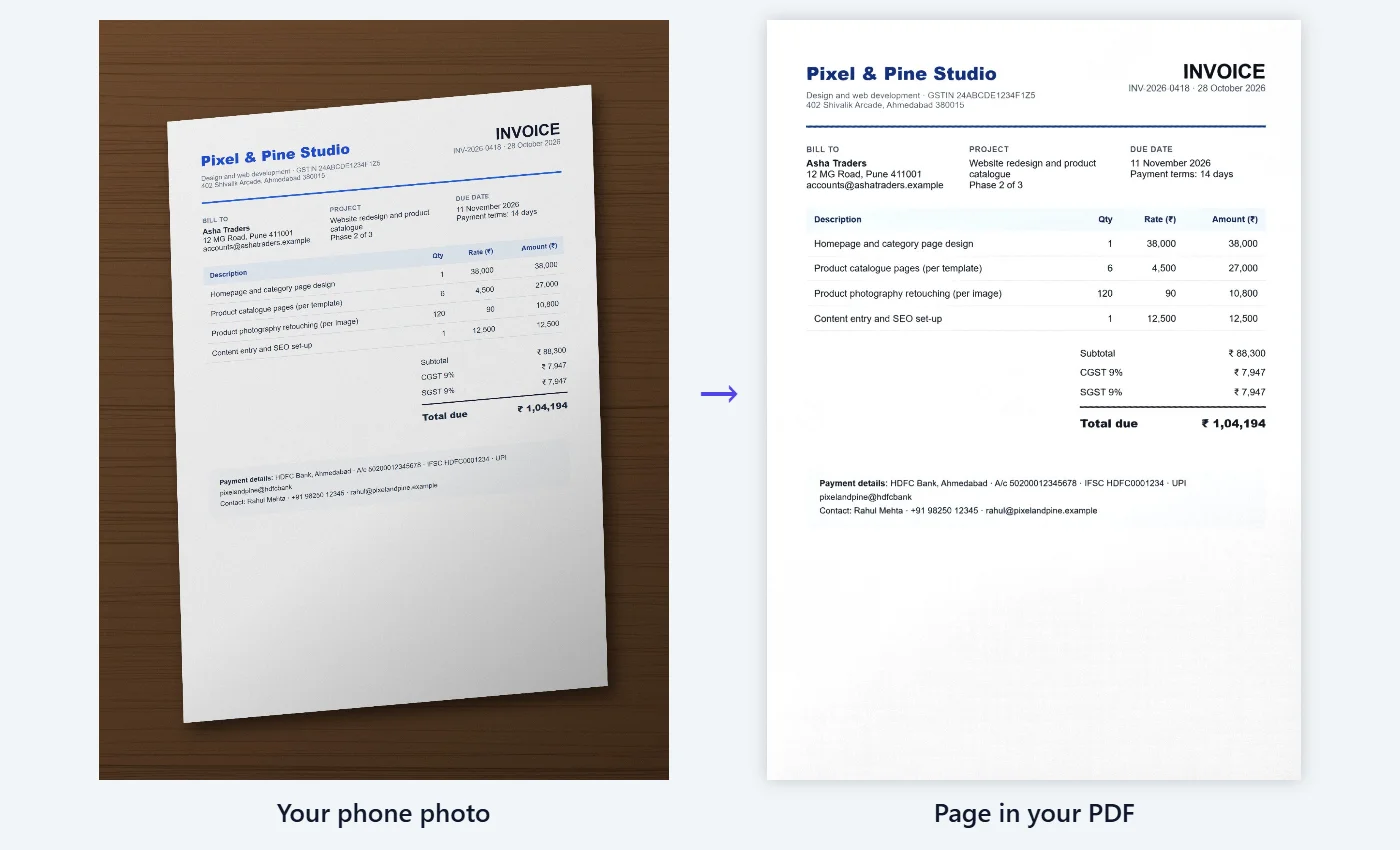
Each cleaned page is saved as a sharp image, and all the pages go into one PDF. Because the pages are pictures, their text isn't searchable yet. OCR PDF can add that afterwards.
All of this happens on your phone. The photos go into your browser's memory, never to a server, which matters when you're scanning an Aadhaar card, a passport or a bank statement.
Scan to PDF or JPG to PDF?
Both tools turn pictures into a PDF, but they do different jobs. JPG to PDF places your images on pages as they are, which suits screenshots, designs and photos that are already neat. Scan to PDF is for photos of paper: it crops away the desk, squares up the page and cleans the light first.
When should you scan a document with your phone?
Scan with your phone whenever you need a paper document as a PDF and there's no scanner nearby. It's quick enough to do on the spot.
- Online applications: certificates, mark sheets and ID proofs for a college, exam or job portal.
- Bills and receipts: expense claims, warranty cards and insurance claims.
- Signed papers: an agreement or a form you've signed by hand that has to go back by email.
- Invoices and records: paper GST invoices from suppliers, so your accountant has a copy.
- Notes and homework: handwritten notes or an assignment a teacher wants as a PDF.
- Travel documents: passport pages, visas and tickets you want to keep on your phone.
A proper scan is easier to read than a photo, and it's far easier for the person receiving it to print or file.
Step 1: How do you take the photos?
Open Scan to PDF on your phone and photograph each page in turn.
Here's how:
- Open debugspot.com/scan-to-pdf in Chrome on Android or Safari on iPhone.
- Put the page on a darker surface in good light, then tap 📷 Take a photo. Your phone's camera opens.
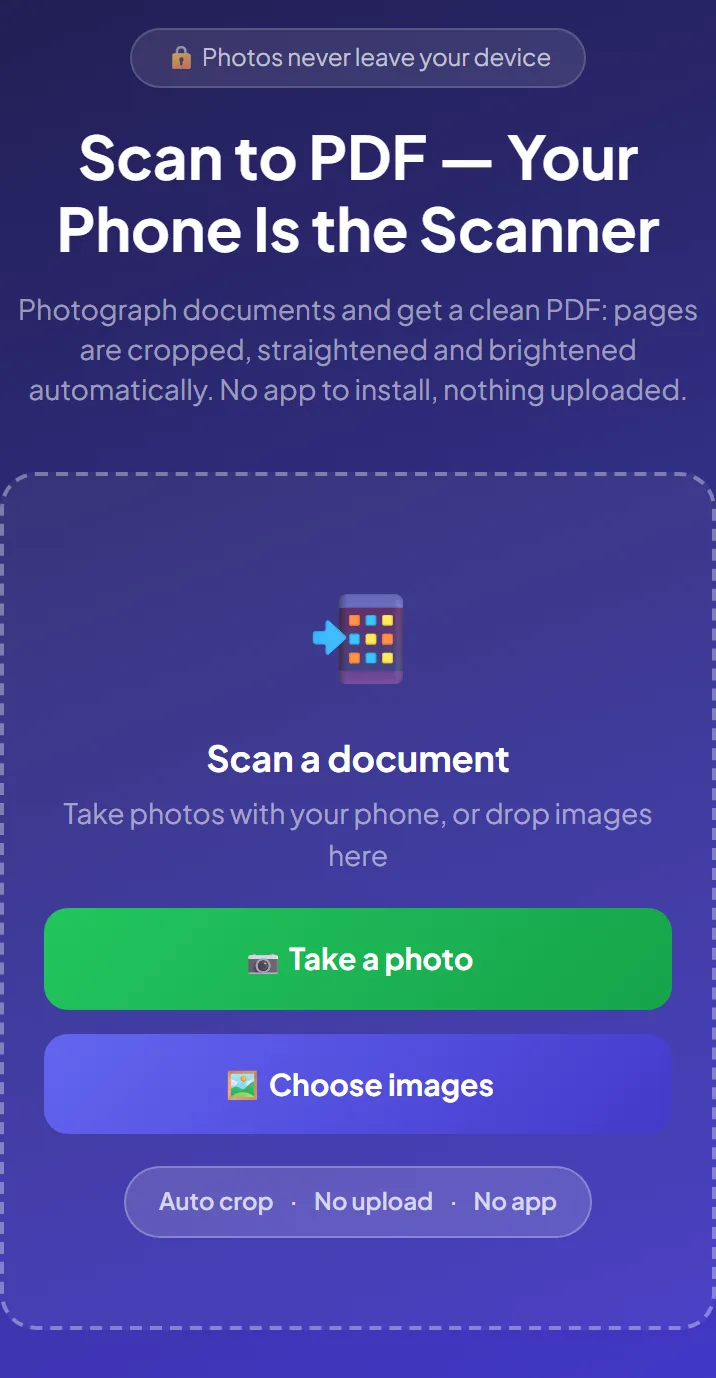
- Hold the phone flat above the page and fit the whole page in the frame, with a little table showing around it. Take the photo and confirm it with your camera's button (on iPhone, that's Use Photo).
- After a second or two, the page appears as a cleaned-up thumbnail. While a photo is still being worked on, its card shows a spinner and the green button says Processing photos…. Once it's done, the button reads Create PDF (1 page).
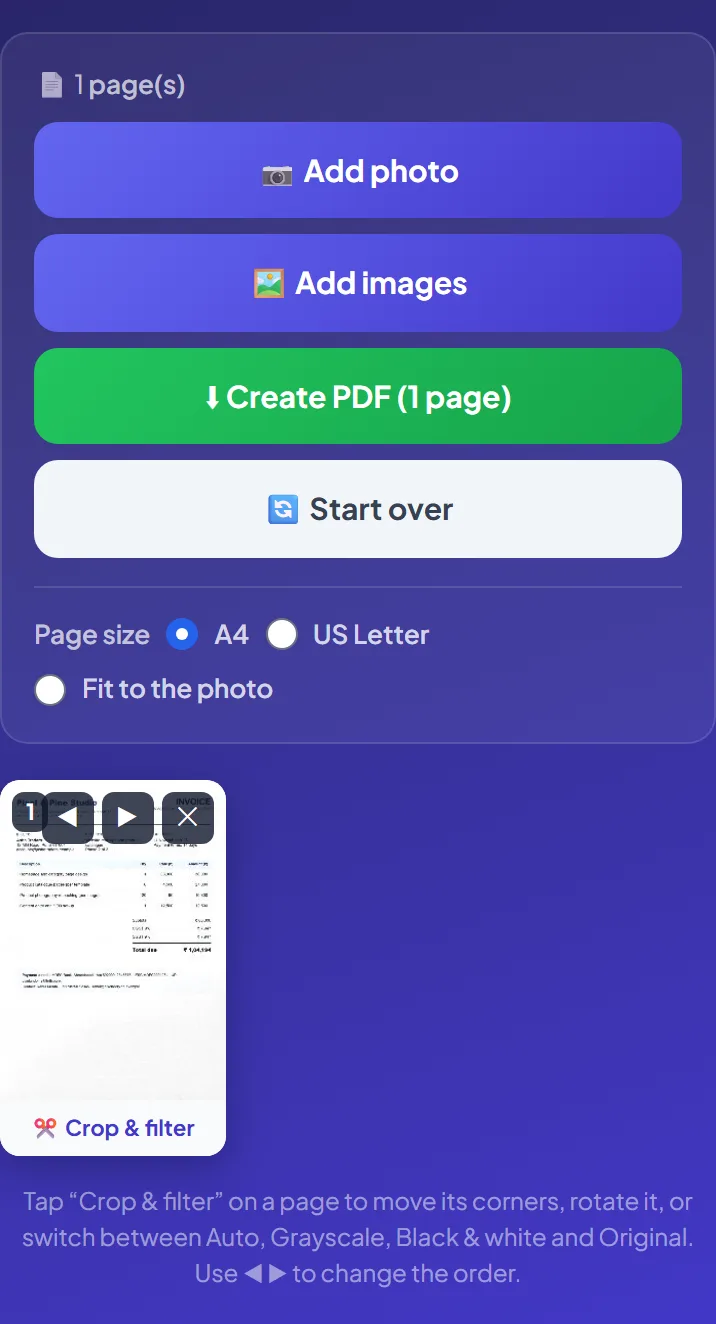
- Tap 📷 Add photo for the next page, and repeat until every page is in.
- Already have the photos in your gallery, including ones saved from WhatsApp? Tap 🖼️ Choose images on the start screen, or 🖼️ Add images once you've added a page. You can pick several at once.
All your pages are now in the list, in the order you added them.
Step 2: How do you fix the crop and the filter?
Most pages need nothing at all, but if one isn't quite right, tap ✂️ Crop & filter under it.
Follow these steps:
- Tap ✂️ Crop & filter under the page. The original photo opens with a green outline and a round handle on each corner.
- Drag each handle onto a corner of the paper. Tap ✨ Auto-detect to let the tool try again, or ⬜ Whole photo to keep the entire picture. If Auto-detect can't find a clear edge, it says so and leaves the corners for you to place.
- Use ⟲ and ⟳ to turn a sideways page. The corners turn with it.
- Choose a filter: Auto (clean colour), Grayscale, Black & white or Original.
- Tick Use this filter for all pages if you want the same look everywhere.
- Tap ✔ Apply, and the page is processed again with your changes. Cancel closes the editor without changing anything.
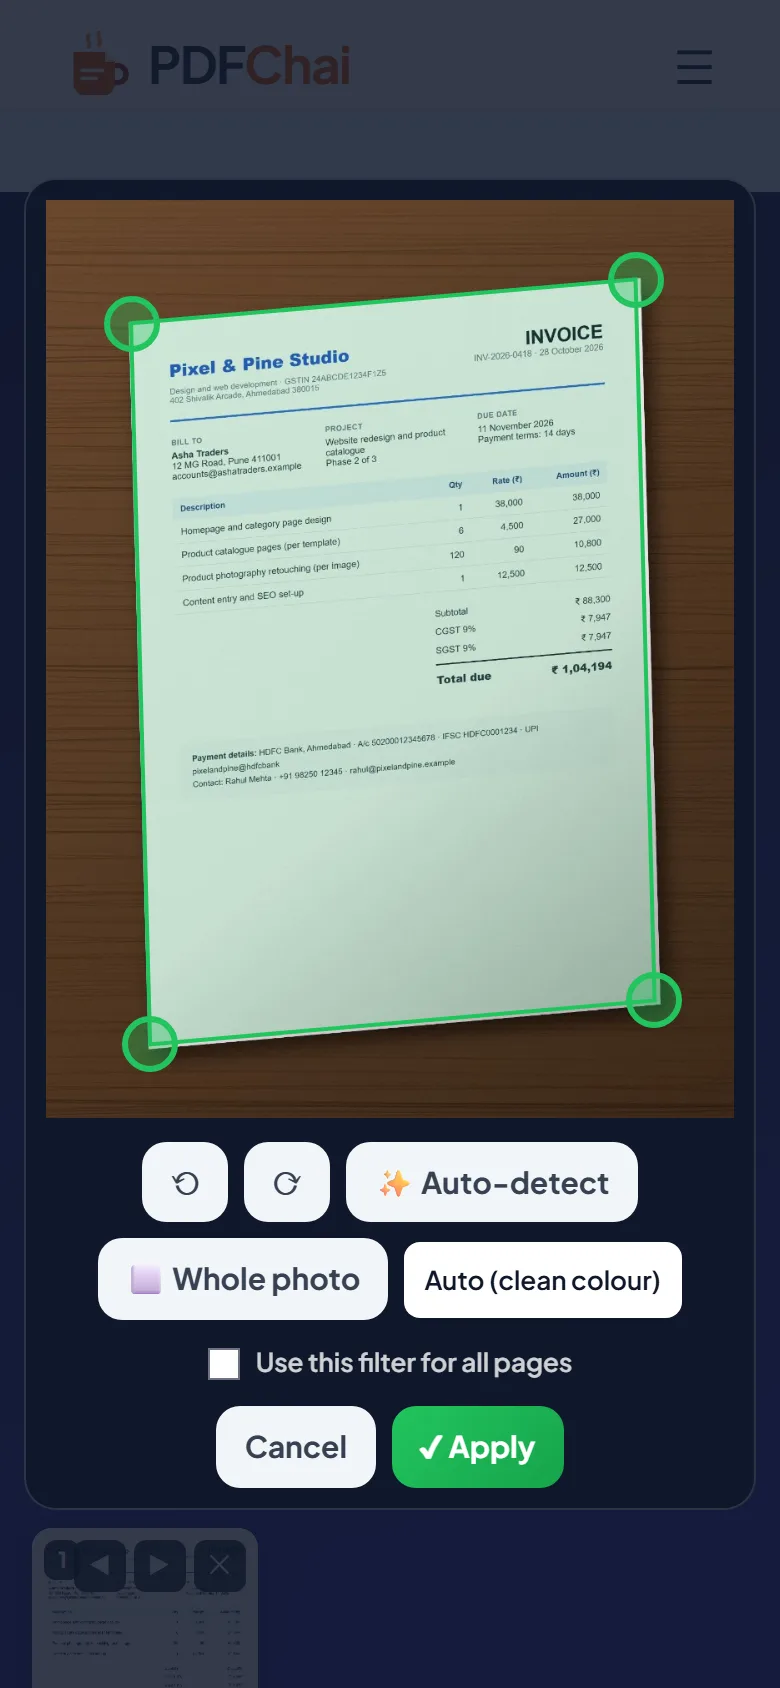
That's it. If two corners cross over, the tool tells you and waits until each handle sits on its own corner of the page.
Step 3: How do you create the PDF?
Check the order, choose a page size and tap Create PDF.
Follow these steps:
- Look through the thumbnails. Move a page with ◀ (earlier) or ▶ (later), and remove one with ✕.
- Under Page size, choose A4, US Letter or Fit to the photo.
- Tap ⬇ Create PDF. The button shows how many pages will go in.
- The PDF downloads with a name like
scan-2026-11-04-pdfchai.pdf, using today's date. A green note confirms the number of pages and the file size. - Forgot a page? Your pages stay in the list after the download, so tap 📷 Add photo, move the new page into place with ◀ and tap ⬇ Create PDF again for an updated file.
That's it. You've got a clean, multi-page PDF that's ready to upload, email or print.
Tip
On A4 and US Letter, each page is fitted onto the sheet and centred, and a wide photo, such as a whiteboard, automatically gets a sideways page. Fit to the photo makes every page the exact shape of what you photographed, which suits receipts and ID cards.
How do you scan to PDF on Android, iPhone, Windows and Mac?
The tool is the same everywhere. What changes is how the photos get in and where the PDF ends up.
Android
Use Chrome, though Samsung Internet and Firefox work too. Tapping 📷 Take a photo opens your camera app, and if your phone asks for camera access, allow it. After each shot, confirm it with your camera's tick or OK button, which looks a little different on every phone. The finished PDF goes to your Downloads folder. Open it from Chrome's download message or the Files app, and share it to WhatsApp, Gmail or Google Drive from there.
iPhone and iPad
Use Safari, although Chrome on iPhone works too. 📷 Take a photo opens the camera, and you tap Use Photo after each shot, or Retake if it's blurry. When the PDF is ready, Safari may ask whether to download it, so tap Download. It's saved to the Downloads folder in the Files app, and the share button sends it by Mail, WhatsApp or AirDrop.
Windows
Chrome, Edge and Firefox all work. On a computer, 📷 Take a photo usually opens the normal file picker instead of a camera. So get the photos from your phone first, through WhatsApp Web, email or Google Photos. Then drag them onto the box on the start screen, or pick them with 🖼️ Choose images. The PDF goes to your Downloads folder.
Mac
Use Safari or Chrome. AirDrop the photos from your iPhone, then drag them onto the box or pick them with 🖼️ Choose images. If a photo shows an error instead of a page, save it as a JPG and add it again. The finished PDF lands in your Downloads folder and opens in Preview.
A real example, start to finish
Asha Traders in Pune received a printed GST invoice from Pixel & Pine Studio: Invoice INV-2026-0418, dated 28 October 2026, for ₹1,04,194. Their accountant wanted a PDF copy for the books.
On 4 November, someone in the office laid the invoice on a wooden desk and took a quick photo, IMG_20261104_101532.jpg. It was tilted, showed plenty of desk, and the paper looked a little grey.
They opened Scan to PDF on the phone, tapped 🖼️ Choose images and picked that photo. After a moment, the page card showed a straight, white invoice. To be sure, they opened ✂️ Crop & filter. The green handles already sat on the paper's four corners, and Auto (clean colour) kept the blue studio name and the table's tinted header.
They tapped ✔ Apply, left the page size on A4 and tapped ⬇ Create PDF (1 page). The phone saved scan-2026-11-04-pdfchai.pdf, with every line readable, from the GSTIN to the bank details and the ₹1,04,194 total. Finally, they ran it through OCR PDF, so the invoice number can be found with a quick search later. The original photo stayed untouched in the gallery, because Scan to PDF only reads your photos and never changes them.
What are the most common mistakes?
Leaving no clear background around the page
The tool finds the page by looking for paper that's brighter than its surroundings. On a white desk, it can't see the edges and keeps the whole photo. The same happens when the paper touches every edge of the frame, because there's nothing to compare it with. Put the page on something darker, step back so a strip of table shows on all four sides, or drag the corners yourself in ✂️ Crop & filter.
Holding the phone at a steep angle
The tool can straighten a tilted page, but it can't add detail that isn't there. If you shoot from a sharp angle, the far end of the page is tiny in the photo and comes out soft once it's stretched. Hold the phone as flat above the page as you can.
Leaving fingers or a curled corner in the shot
Fingers holding the page down, or a corner that curls up, change the outline the tool looks for, so the crop can come out crooked. Press folded pages flat before you shoot, weigh the edges down with something that stays out of the frame, and keep your hands clear.
Picking Black & white for a colour document
Black & white turns every pixel either black or white, so coloured stamps, blue-ink signatures and photos lose detail. Keep Auto (clean colour) for those, and save Black & white for plain typed or printed text.
Tapping Start over by mistake
🔄 Start over clears every page straight away, without asking first. The ✕ on a page card works the same way. If you've photographed a long document, create the PDF before you tidy up.
Sending a huge file to a portal
Pages are saved as sharp images, so a long document can get big. Many portals set a size limit, so check the size in the green note and shrink the file with Compress PDF if you need to.
What are the best tips for scanning with your phone?
How do I take sharper photos?
Hold the phone flat above the page, rest your elbows on the table and tap the screen on the text to focus before you shoot. Good light matters more than a good camera. Daylight from a window beats the flash, which can leave a glare spot over the words. If you have to use the flash, tilt the phone slightly so the glare misses the text.
Which filter should I pick?
Auto (clean colour) suits most documents and keeps stamps and coloured logos. Grayscale is a good middle ground for pages with photos. Black & white gives the crispest, smallest pages for typed text, and Original keeps the photo as taken, only cropped and straightened.
Can I set one filter for every page?
Yes. Open ✂️ Crop & filter on any page, choose the filter, tick Use this filter for all pages and tap ✔ Apply. Pages you add after that use the same filter too.
Which page size should I choose?
Pick A4 in India, the UK and most other countries, and US Letter in the US and Canada. Fit to the photo keeps each page's own shape, which suits receipts, ID cards and small slips.
How do I scan both sides of an ID card?
Photograph the front, turn the card over and photograph the back as the next page. Use Original or Auto (clean colour) so the photo on the card stays natural, and check the order with ◀ and ▶.
Can I rotate a page I photographed sideways?
Yes. Open ✂️ Crop & filter under that page, tap ⟲ or ⟳ until it's upright and tap ✔ Apply. The other pages stay as they are.
How do I keep the file small?
Use Black & white for text pages, since they come out smallest. If the PDF is still too big for a portal, run it through Compress PDF. Our guide on what to do when a PDF file is too large to upload has more ideas.
Can I make the scan searchable?
Yes. Run the PDF through OCR PDF, which reads the words and adds an invisible text layer in 23 languages, including Hindi, Gujarati, Tamil and Bengali. Our guide on how to make a scanned PDF searchable with OCR shows the steps.
How do I scan a long document quickly?
Don't stop to check each page. Photograph every page in order with 📷 Add photo, or take them all with your camera app and pick them in one go with 🖼️ Choose images. Then scroll through the thumbnails once and fix only the pages that need it.
How do I combine scans from different days?
Create a PDF each time, then join them in the order you want with Merge PDF.
Your phone is the scanner
There's no need for a scanner, a print shop or another app. A few photos and one tap give you a PDF that looks like it came off an office scanner.
PDFChai does all the cropping and cleaning inside your browser, so your documents stay on your own phone.
FAQs
1. Do I need to install a scanner app?
No. Scan to PDF works in your phone's browser. Tapping 📷 Take a photo opens your normal camera, and everything else happens on the page.
2. Are my photos uploaded to a server?
No. Finding the edges, straightening, filters and building the PDF all happen on your phone. The photos never leave your device.
3. Can I scan on a laptop or computer?
Yes. Use 🖼️ Choose images to pick photos you've already taken, such as ones sent from your phone, or drag them onto the box. Everything else works the same way.
4. How many pages can I scan into one PDF?
As many as you need, since there's no page limit. For long documents, photograph all the pages first, then check the order and crops at the end.
5. Why does my scan look grey or patchy?
The paper was probably in deep shadow or dim light. Auto (clean colour), the starting filter, evens out mild shadows, but it can't bring back detail that's lost in the dark. Try Black & white for text pages, or retake the photo near a window.
6. Why wasn't the edge of my page found?
Edge finding needs a bright page on a darker background. On a white desk, in dim light, or when the page fills the whole photo, the tool keeps the whole picture. Open ✂️ Crop & filter and drag the corners onto the page.
7. Is Scan to PDF really free?
Yes. There's no signup, no watermark and no limit on pages or scans.
8. Which image types can I add?
Photos from your camera, gallery or WhatsApp all work, including JPG, PNG and WebP files. If your browser can't open a photo, the page card shows an error, so save it as a JPG and add it again.
9. Can I change the order or remove a page?
Yes. Use ◀ and ▶ on a page card to move it, and ✕ to remove it. The PDF follows the order you see on screen.
10. Can I scan handwritten notes or a whiteboard?
Yes. Photograph them the same way, then choose Black & white in ✂️ Crop & filter so the writing stands out against a clean white background. For a wide whiteboard, A4 and US Letter give it a sideways page.
Scan your documents to PDF with PDFChai in just a few clicks!
Scan now